![]()
Working with Posts
When a new Topic is created, the first post is created from the message of the Topic. Essentially, all posts to the Topic are replies to the first.
Replying to a Post
Replying to a Post from the Workarea
1. In the Workarea, click the Content tab
2. Select a Discussion Board, then select a Forum from the folder structure.
3. The Forum’s topics appear in the right frame. Click the one that has the post that you want to reply to.
4. The next screen, View Topic, displays all posts to the selected topic.
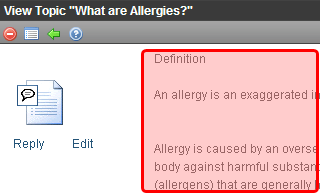
5. Find the post that you want to reply to by reading its text (illustrated below).
6. Click reply.
7. Enter a Title for the post.
8. In the Description field, enter the text of your post.
Replying to a Post from the Web Site
1. Go to the Web page that hosts the Discussion Board.
2. Click the Forum of interest.
3. Click Add Reply.
Note: If a topic is moderated, a message appears stating that your reply is pending moderator approval.
There are two editors that site visitors can use when replying:
eWebEditPro (scaled-down version)
eWebEdit400
For users who sign in before posting, this decision is made for the user at the Forum Editor field on the Edit User screen.
If users does not sign in, eWebEdit400 is the editor.
If a site visitor is using an Apple Macintosh computer, eWebEdit400 is the editor regardless of the Forum Editor field value on the Edit User screen.
Quoting a Post
Quoting a post’s comments means that your reply begins with the original post’s comments. You can then add your comments and even edit the quoted post, so that you can include only the portion on which you are commenting.
To quote a post, follow these steps.
1. Go to the Web page that hosts the Discussion Board.
2. Click the forum of interest.
3. Click a topic.
4. Find the post you want to quote.
5. Click Quote.
6. The editor appears with the quoted information at the top of the text area.
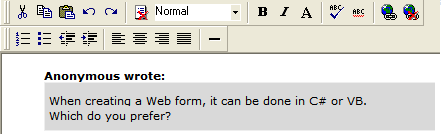
7. Add your comments below the quote.
8. Click Post.
Approving a Post
Approving a Post in the Workarea
When defining a Forum, you can check the Moderate Comments field. If you do, posts to the Forum must be approved before they appear on the Web site. Only users who are assigned the Moderate permission are allowed to approve a post. See Also: Discussion Board Permissions
You can approve a post from the Workarea or the Forum on the site. See also Using Discussion Boards on Your Web Site.
To approve a post in the Workarea, follow these steps.
1. In the Workarea, click the Content tab.
2. Select a Discussion Board, then a Forum from the folder structure.
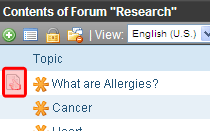
3. The Forum’s topics appear in the right frame. Click the one that has the post that you want to reply to. (Unapproved posts have an “Approval Needed” icon in the left column, as highlighted in red below.)
4. The next screen, View Topic, displays all posts to the selected topic.
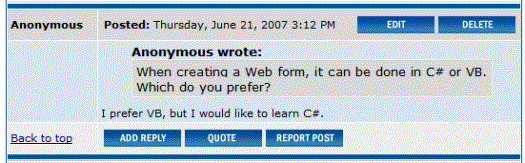
5. Find the post you want to reply to. Unapproved posts have a yellow border (Illustrated below).
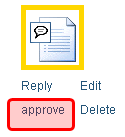
6. Click approve under the post icon.
Approving a Post on the Web Site
When defining a Forum, you can check the Moderate Comments field. If you do, Forum posts must be approved before they appear on the Web site. Only users who are assigned the Moderate permission can approve a post. See Also: Discussion Board Permissions
To approve a post from the Forum, follow these steps.
1. Log into the site.
2. Navigate to the Forum.
3. Click Moderate ( ).
).
4. The Forum’s Control Panel appears.
5. Click the topic.
6. The topic appears. Posts requiring approval have an Approve button ( ).
).
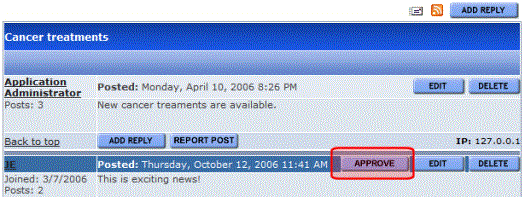
7. Click Approve ().
8. A message notifies you that the post was approved.
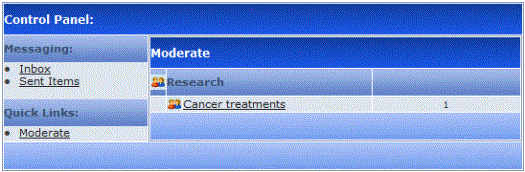
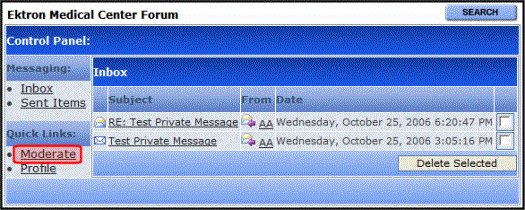
Moderating from the Control Panel
Users who have permission to moderate a Forum can do so from the Control Panel by clicking the Moderate link.
Once Moderate is clicked, the user sees a list of items that need approval.
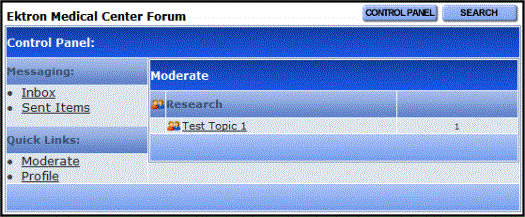
Clicking an item opens the post. From this screen, you can edit, approve, or delete the post. See Also: Approving a Post on the Web Site.
Editing a Post
Editing a Post from the Workarea
You can edit the text of a post but you cannot edit its title.
Note: You can also edit a post from the Web site.
1. In the Workarea, click the Content tab.
2. Select a Discussion Board, then a Forum from the folder structure.
3. The Forum’s topics appear in the right frame. Click the one that has the post that you want to edit.
4. The next screen, View Topic, displays all posts to the selected topic.
5. Find the post that you want to edit.
6. Click edit under the post icon.
7. The Edit Reply screen appears. Within the editor, update the text as needed.
8. Click Save ( ).
).
Editing a Post from the Web Site
1. Go to the Web page that hosts the Discussion Board.
2. Click the Forum of interest.
3. Find the topic you want to edit.
4. Click Edit.
Deleting a Post
Deleting a Post from the Workarea
1. In the Workarea, click the Content tab.
2. Select a Discussion Board, then a Forum from the folder structure.
3. The Forum’s topics appear in the right frame. Click the one that has the post you want to delete.
4. The next screen, View Topic, displays all posts to the selected topic.
5. Find the post that you want to delete.
6. Click delete under the post icon.
Deleting a Post from the Web Site
1. Go to the Web page that hosts the Discussion Board.
2. Click the Forum of interest.
3. Find the topic you want to delete.
4. Click Delete.
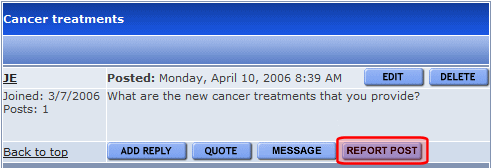
Reporting a Post
You can allow site visitors to inappropriate report posts, such as spam or offensive posts.
When a site visitor clicks the Report Post button (located at the bottom of the post), an email notification is sent to all Forum moderators. Any moderator can review the post and decide to edit, delete, or leave it alone. Working with Posts
If you want to edit the message that is sent when someone reports post, go to the Workarea and choose Settings > Configuration > Discussion Boards > Messages and select ReportForumPost.
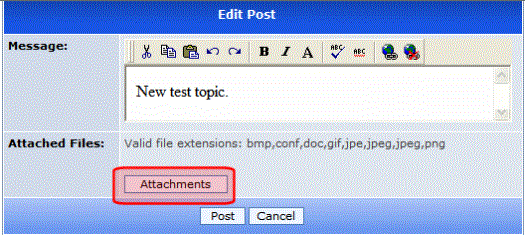
Attaching Images and Files to a Post
See Also: Adding Video to a Post
While creating a topic or post, you can add an attachment. In the Attached Files field, a list of files that will be attached appears. The list of valid file extensions also appears. The list of file extensions and maximum size of the file upload are defined for the Discussion Board. See Accepted Extensions and Max File Size.
Attaching a File
To add an attachment to a topic or post, follow these steps.
1. Create a new post or reply to an existing post.
1. Click the Attachments button below the editor.
2. The Attachments window appears.
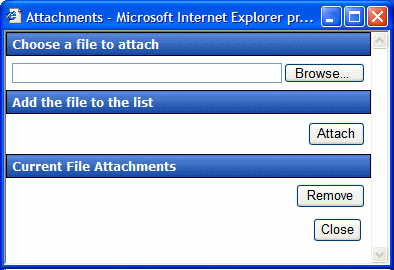
3. Click Browse... to navigate to the file that you want to attach.
4. Click Open.
5. Click Attach to attach the file to the post.
6. The file appears in the list of Current File Attachments.
7. When all attachments have been added, click Close.
Viewing an Attached File
To view an attached file, click its name in the post.
Removing an Attached File
To remove a file from the list of attachments, follow these steps.
1. Click Attachments below the editor.
2. Highlight the attached item.
3. Click Remove.
4. Click Close.
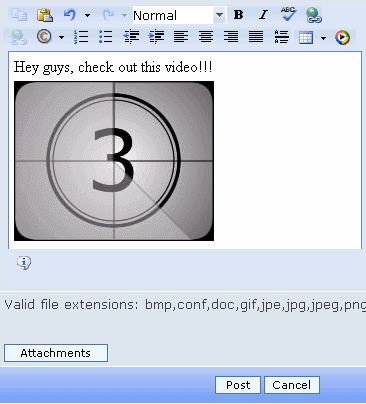
Adding Video to a Post
A user can add video to a post by clicking Add Video ( ) in a Forum post using eWebEdit400. The following are prerequisites for this action.
the embed tag must be added to the Accepted HTML property in the Workarea Forum’s properties. See Also: Accepted HTML.
a user must be using eWebEdit400 See Also: Using eWebEdit400
the video must be in the .wmv format
the video must reside in a hosted location. For example,
http://www.example.com/myvideos/fridaylunch.wmv
Once you click Add Video (), enter the path to the video in the dialog box and click OK. A place holder is then added to the post.
Searching a Forum’s Posts
The Forum server control includes a search feature that lets site visitors search through all posts on your site. Any user can access the search from the Forum screen (see below).
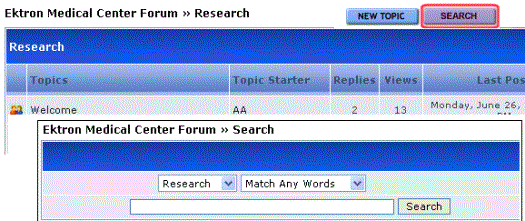
When a site visitor clicks Search, he can search the current Forum (the default value), select a different Forum, or search all Forums.
Moving a Topic and Its Posts to Another Forum
If you want to move a topic and its associated posts in one forum to another, follow these steps.
Prerequisite: The forum to which you want to move the topic and posts must exist. See Creating a Forum.
1. Access a page on your Web site that has a login button.
2. Sign in as a member of the Administrators group or as a Moderator of the board.
3. Navigate to a page with Discussion Board.
4. Select a forum from the Discussion Board.
5. Navigate to a topic page.
6. Click the Move to... dropdown list. (It appears in the right corner above the posts.)
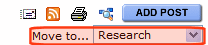
7. Select the topic to which you want to move.
8. Confirm that you want to move all posts.
Replacing Words in a Post
You can configure Ektron CMS400.NET to replace unwanted words in a post. This feature is useful for changing words that are obscene, indecent, or should not appear on your site. In addition, Replace Words can fix commonly misspelled words. For example, the can replace teh. See Also: Adding a Replacement Word
The Replace Words feature works with exact matches but does not append words. For example, if you replace car with auto, the sentence I bought the car from the cartel becomes I bought the auto from the cartel. Note that cartel did not change to autotel even though the word car appears in cartel.
This feature is more fully explained through the following topics.
Viewing Existing Replacement Words
Using Regular Expressions
If you would like the Replace Words feature to modify words that contain a word you do not want used, you can use Regular Expressions. A Regular Expression, often referred to as regex, is a pattern of metacharacters placed around a word that describes a string. Used for string manipulation, regex allows you to detail a succinct description of a group of words without having to detail each word in the group.
|
Regular Expression |
Description |
|
. |
Matches any character, similar to a wildcard. For example, .ar matches any three letter word ending in ar, such as car, bar, tar or far. |
|
| |
Acts as an or operator. For example, steak|stake would find steak or stake. |
|
[ ] |
Matches one character that is between the brackets. For example, [rst] matches r, s or t. [d-g] matches d, e, f, or g. Another example, [bc]ar matches bar and car. If you need to match a dash (-), use it a the beginning or end of the group. For example, [xyz-] or [-xyz]. |
|
[^ ] |
Matches one character that is not in the group. For example, [^rst] matches any character other than r, s or t. Another example, [^bc]ar does not match bar or car, but does match words, such as tar or far. |
|
^ |
Matches the beginning of any line. For example, ^[bc]ar matches bar or car, but only at the beginning of a line. |
|
$ |
Matches the end of any line. For example, ^[bc]ar matches bar or car, but only when it appears at the end of a line. |
|
( ) |
Marks a sub expression. For example, alt(a|e)r finds altar or alter. |
|
* |
When an expression is followed by *, it matches zero or more versions of the expression. For example, [rst]* finds (blank), r, s, t, rs, sr, rt, tr, st, ts, rst, rts, srt, str, trs and tsr. |
|
+ |
When an expression is followed by +, it matches one or more versions of the expression. This differs from * because it does not match (blank). It must match at least one character. For example, r+ matches r, rr, rrr and so on. |
|
{x,y} |
Must match at least x times and not more than y times. For example, s{2,4} matches ss, sss and sss. You can also use {x} to specify an exact match. For example, s{3} matches sss. You can use {x,} to specify that the match is at least x amount of times. For example, s{4} matches ssss, sssss, ssssss and so on. |
|
? |
Must match the preceding character zero or one times. For example, Boa?rder matches boarder and border. |
Adding a Replacement Word
To add a replacement word to a Forum, follow these steps.
Note: In addition to using Replace Words for a specific Forum, you can access the Replace Word feature from the Workarea > Settings > Configuration > Discussion Board > Replace Words. If you have more than one Forum, this allows you select to which Discussion Boards the Replace Words feature is applied.
1. In the Workarea, click the Content tab.
2. Select a Forum from the folder structure.
3. Click New > Replace Word.
4. The Replace Word screen appears.
5. Add the word to be replaced in the Old Word textbox.
6. Add the replace word in the New Word textbox.
7. Select the language for the Replace Word.
8. Click Save ().
Viewing Existing Replacement Words
To view a list of existing words that are replaced, follow these steps.
1. In the Workarea, click the Content tab.
2. Select a Forum from the folder structure.
3. Click View > Replace Words.
4. A list of word to be replaced appears.
Editing a Replacement Word
1. In the Workarea, click the Content tab
2. Select a Forum from the folder structure.
3. Click View > Replace Words.
4. Click either the Old Word or the New Word to edit.
5. Click Edit ( ).
).
6. Change the Old Word, New Word or Language.
7. Click Save ().
Deleting a Replacement Word
1. In the Workarea, click the Content tab.
2. Select a Forum from the folder structure.
3. Click View > Replace Words.
4. Click either the Old Word or the New Word to delete.
5. Click Delete (![]() ).
).
6. A dialog box asks if you are sure you want to delete.
7. Click OK.
Creating and Editing Emoticons
An emoticon is an icon used to express emotion in a Forum post. For example,  .
.
There are two ways to insert an emoticon.
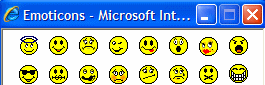
A Forum participant clicks the emoticon toolbar button  . Next, a small window appears with available emoticons (shown below). The user clicks one to insert it.
A Forum participant enters a few characters that resemble the image. For example, to insert , the user enters O:\).
While working in a post, the user only sees the text. But when the post is saved, Ektron CMS400.NET converts the text to the corresponding emoticon. In all subsequent work with the post, users see only the emoticon.
Viewing Emoticons explains how to find the list of available emoticons and the characters used to insert each one.
You can view and modify or delete a standard set of emoticons. You can also create your own.
Inserting Emoticon Images
Place emoticon images in the following folder: webroot\Workarea\threadeddisc\emoticons. Administrators reference these files when editing or creating new emoticons.
Viewing Emoticons
A standard set of emoticons is supplied with Ektron CMS400.NET. After viewing them, you can add new ones as well as delete or modify standard ones.
To see Ektron CMS400.NET’s emoticons, follow these steps.
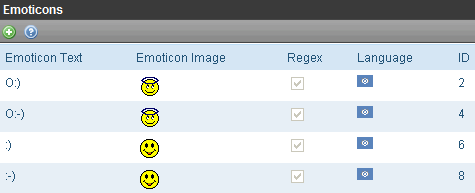
1. Within the Ektron CMS400.NET Workarea, go to Settings > Configuration > Discussion Boards > Emoticons.
2. A list of emoticon images and text appears.
Editing Emoticons
To edit an emoticon, follow these steps.
1. Within the Ektron CMS400.NET Workarea, go to Settings > Configuration > Discussion Boards > Emoticons.
2. Click the emoticon text or image that you want to edit.
3. Click Edit ().
4. Use the following table to guide you through the screen’s fields.
Fields on the Emoticons Properties Screen
|
Field |
Description |
|
Emoticon Text |
Enter or update the characters a Forum participant would enter to insert this emoticon. |
|
Emoticon Image |
Enter the name of the image file that will appear after a user enters the above Emoticon text and saves the post. Administrators place emoticon images in the siteroot\Workarea\threadeddisc\emoticons folder. |
|
Regex |
|
|
Language |
Select the emoticon’s language from the dropdown list. If a Forum is language-specific, only emoticons assigned to that language or all languages are available. |
See Also: Creating and Editing Emoticons
Deleting Emoticons
To delete an emoticon, follow these steps.
1. Within the Ektron CMS400.NET Workarea, go to Settings > Configuration > Discussion Boards > Emoticons.
2. Click the emoticon that you want to delete.
3. Click Delete ( ).
).
4. Reply to the confirmation message.
Creating Emoticons
To create an emoticon, follow these steps.
1. Within the Ektron CMS400.NET Workarea, go to Settings > Configuration > Discussion Boards > Emoticons.
2. Click Add ( ).
).
3. Respond to the fields on the screen. SeeEditing Emoticons.
4. Click Save ().
See Also: Working with Posts


![]()